It’s that time of year again- standardized tests, college admissions, commencement. Graduation is a once-in-a-lifetime event. Celebrate your 2021 grad with custom vinyl decorations to make their day pop!
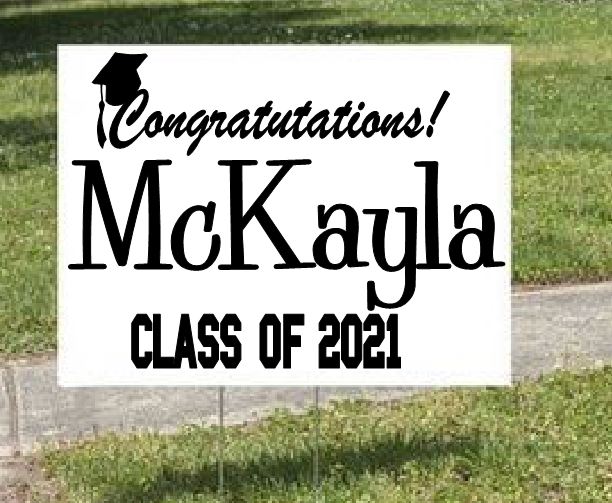
Homemade Yard Signs
Deck out your lawn with a custom sign congratulating the graduate at home! You can add a name, nickname, school, degree, valedictorian, mascot, or year.
Tell your grad you’re proud without saying a word!
Party Decorations
Is your school mascot a cougar, or a maverick, or the bears? Show off your school pride with footprints leading to your house, up to your door, or to the graduation stage.
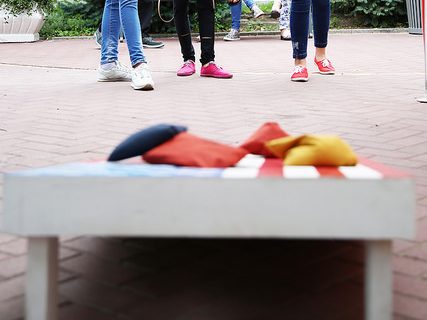
To complement your party theme, use custom vinyl to personalize your card display, serving table, centerpiece, or cornhole. Deck out your party with a school mascot, motto, or logo!
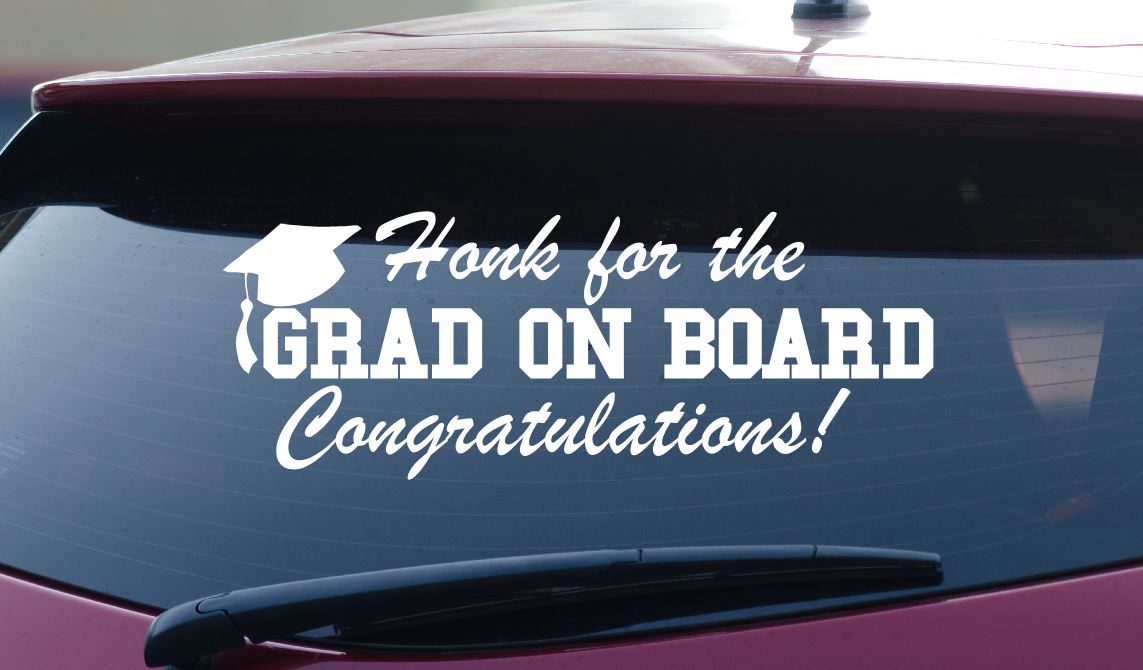
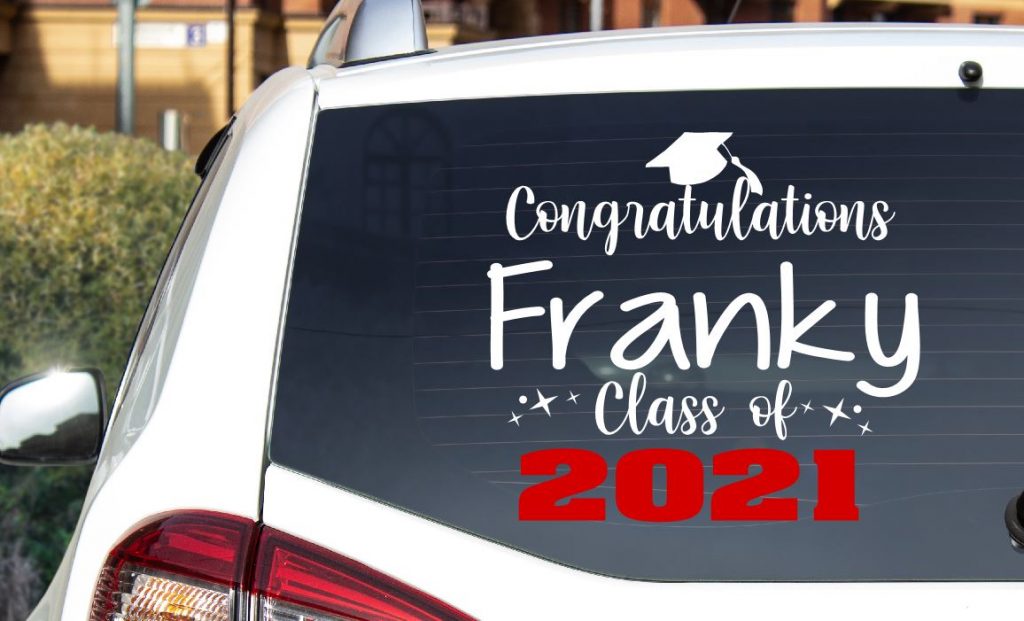
Custom Car Decals
Stand out on the way to the stadium! What better way to embarrass your grad than soliciting honks, waves, and kisses?
Perfect for the graduation parade!
Graduation Hat Stickers
Stick out from the crowd so Grandma can see you. Customize your graduation cap with your year, school, name, or degree to create a perfect personal keepsake for the years.
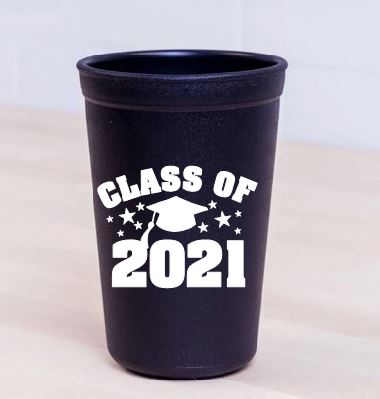
Customized Grad Swag
Don’t settle for holding “oh, that party!” Give your grad a celebration to remember! Cap it off (no pun intended) with customized balloons, cups, and all sorts of other fun swag.
Cup and gown, anyone?
Let us know how we can help you make graduation a special day for your senior! Send the file you want in vinyl and we’ll help honor your grad on their big day.
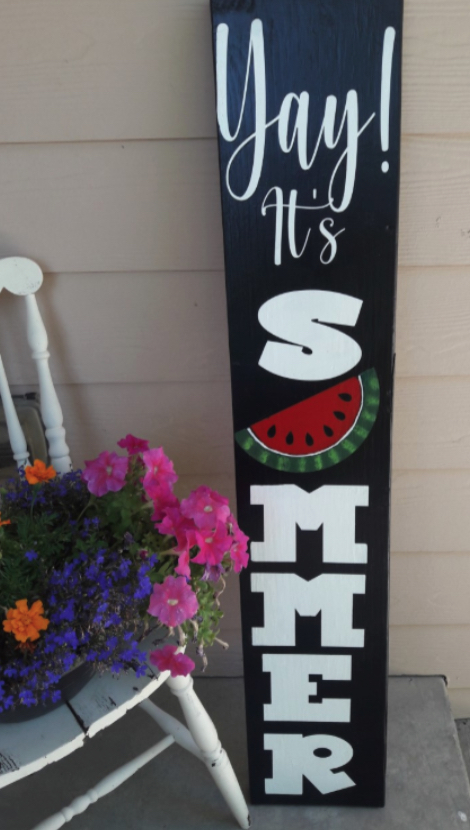
After all that’s been going on, summer’s finally in full swing! Add some charm and a rustic, farmhouse feel to your home’s entryway with a DIY porch sign to welcome summer. Porch signs are a great way to decorate your front steps without burning a hole in your wallet.
How to Make a Porch Sign
1. Choose your wood
The best types of wood to make a porch sign are MDF (Medium-density fibreboard) pine, or birch. There isn’t much of a difference between them, so it’s personal preference. A new piece of wood for a porch sign will typically cost about $10.
If you’re working with a smaller budget, you can go to the clearance bin at your local Lowe’s or Home Depot. At Home Depot, they put their “unsellable” wood on cart and spray paint it a certain color, and you can get it for dirt cheap.
As an alternative, using reclaimed wood will give your porch sign more of a rustic appearance. Old wooden window shutters make a great base if you can find one the right size.
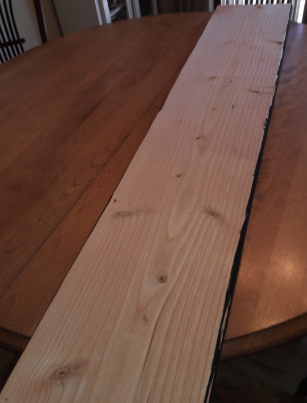
For this porch sign we used 1x8x8 piece of wood. Home Depot will also cut your wood down to the size you want. We had them cut this one in half lengthwise, so that we have 2 boards. This is also a heavier board that will stand up to gusts of wind.
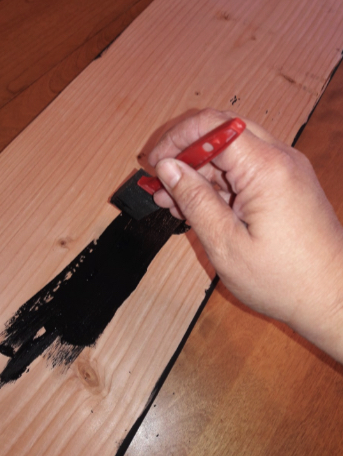
2. Paint the board
The base color of the sign can be any color you want, but we went with a black base color. In my experience, the best paint to use is chalk paint. It covers the wood in almost one coat, and stands up to the grooves of the board. If your wood is extra rough or old/splintery, you will want to sand the board before painting it. As for brushes, I used both a foam sponge brush and regular paint brushes.
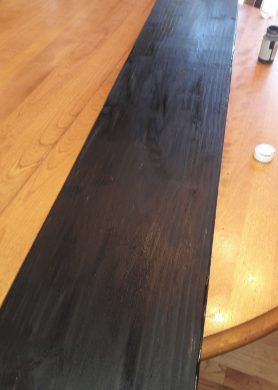
Here is what the board looks like fully painted with the black chalk paint:
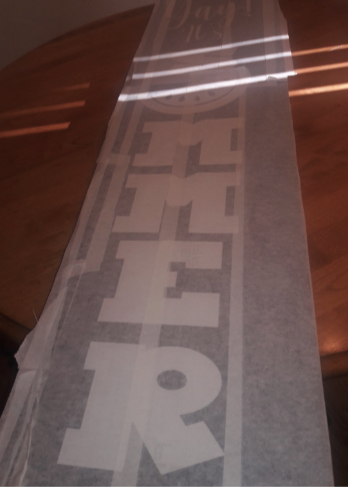
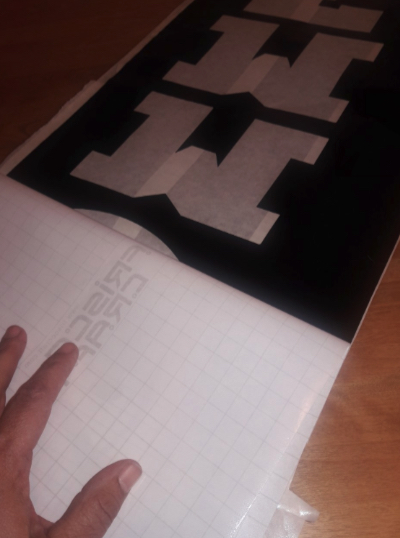
If you want to make your own, the easiest way to make a stencil is to order a vinyl decal. Make sure that you order it in a different color than your sign’s base layer, or it will be hard to see the stencil.
Instead of using the vinyl lettering itself on the board, pull the letters out instead of all the excess vinyl around everything. Basically, this creates a reverse decal that you can use as a stencil. We will be painting inside of the letters and watermelon to create our final look on the sign. Wherever you see the white, that’s where to put paint.
Making the stencil
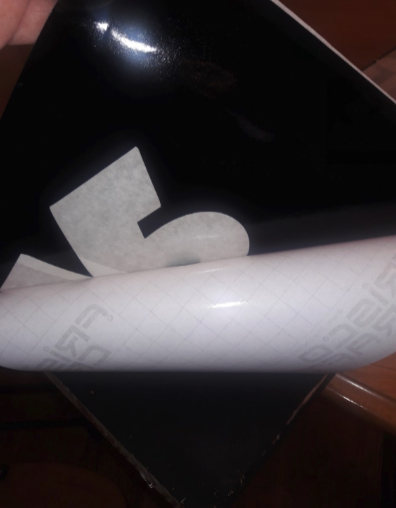
First step is to remove the backing paper from the vinyl decal to get to the stencil.
When you’ve done that, it should look like the stencil below:
Applying the stencil
The next step is to place the vinyl on the board, and rub the vinyl on the top layer. We are using our trusty grocery store card to help us out with this job! Using a small, flat object like a credit card or a grocery store card to rub the vinyl helps smooth it out and prevent air bubbles.
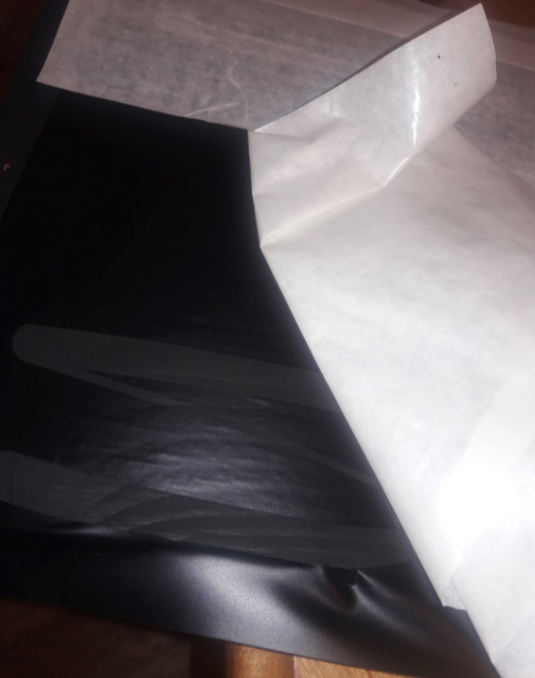
Now you will remove the cloudy layer on top of the stencil called the transfer tape. When the transfer tape is removed, the vinyl stencil will be left.
We made a mistake when we chose black for the vinyl stencil. Black vinyl on a black board made it hard to see if we placed everything correctly. Use opposite colors of vinyl from your painted board.
Painting the stencil
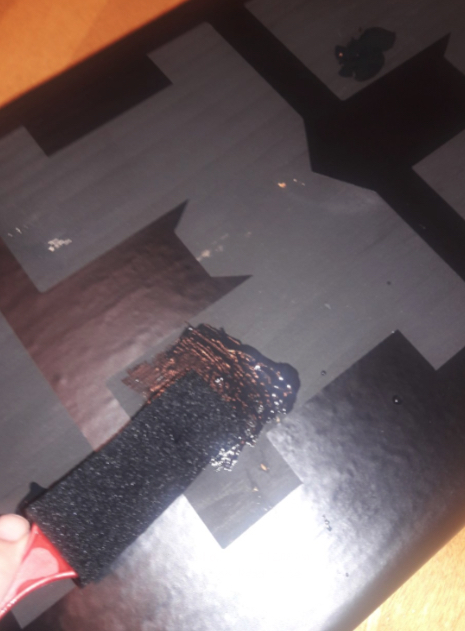
Next, paint in the stencil with another color. The gray area is where we painted. The black stencil is very hard to see, so I would recommend using a white stencil.
Now we are going to paint over the stencil with the same black paint. This will seal any places that might not be sealed with the vinyl. That way when you use the white paint, it won’t bleed through the stencil onto the sign.
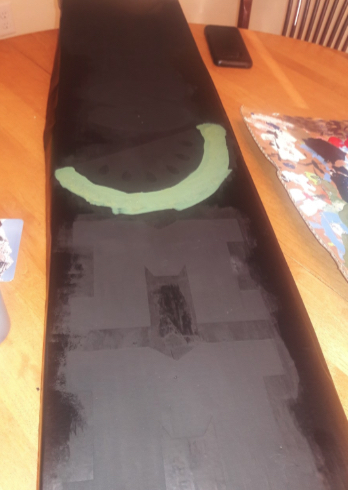
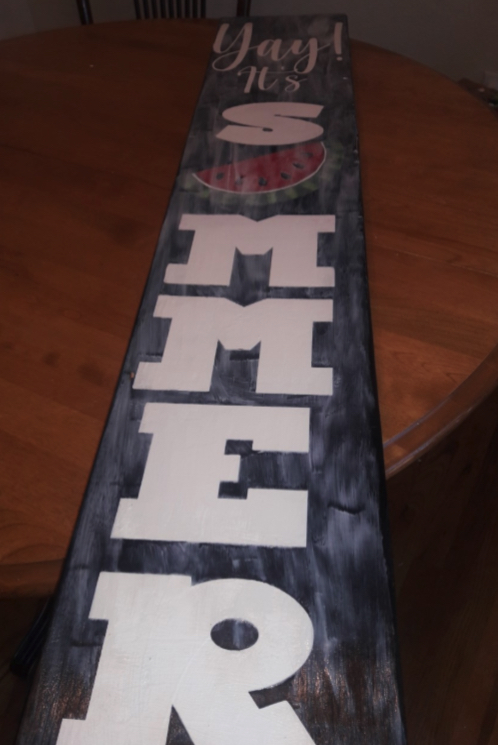
Here is the board fully painted. You can see that we started painting the watermelon rind green (don’t worry about it if you used a different color to start the rind- you won’t be able to see it).
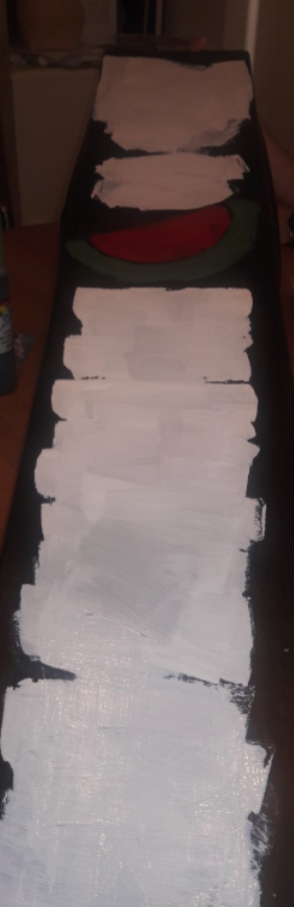
4. Final coat
Let the previous coats fully dry on the porch sign before starting with the other colors. I used white for the letters, and red and two shades of green for the watermelon. You don’t need to completely cover the board with paint, just around the letters and the watermelon.
Once again you will need to let this layer of paint dry. I used “Apple Barrel” white paint, and it did not cover as well as the chalk paint with the vinyl stencil, so I needed 3 coats of paint for this part of the project. You will know when the paint is completely dry because the wet areas will not be cool to the touch.
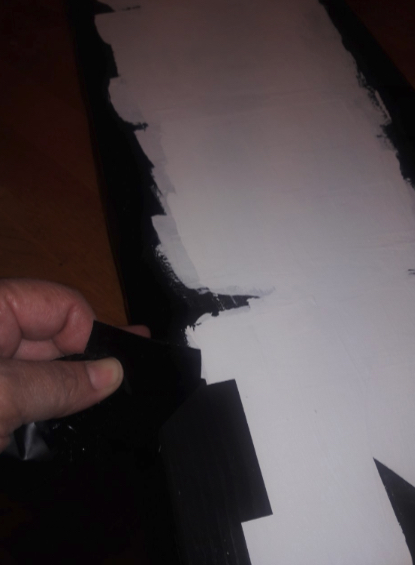
5. Remove the stencil
Now that the paint is dry, you can start to remove the vinyl. You don’t have to be too careful pulling the vinyl off the porch sign, because the paint is dry.
It is hard to see the black vinyl being removed from the black board, but you can see the crisp edge of paint along the letter ‘M’ here:
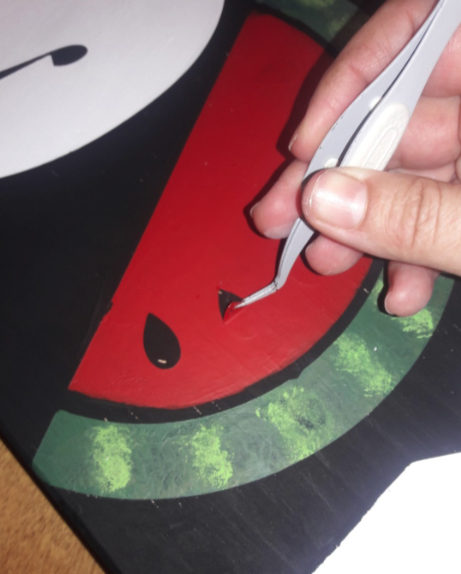
To get the centers out of the letters and the seeds out of the watermelon, I used reversible tweezers and poked the vinyl, and then pulled them out.
6. Seal the board
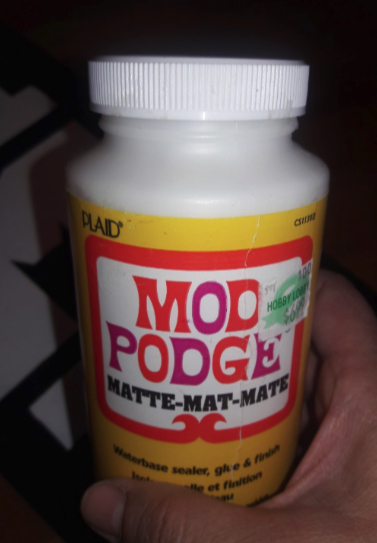
If you are planning on putting your sign outside, I would recommend using a sealer to help protect the board from warping and the paint peeling off. The hot temperature of the sun can cause the paint to expand and then contract when the sun goes down. This can cause the board to become mis-shaped, and the paint to peel and crack.
A sealer should help to prevent this, and also keep the paint bright and the board straight. I used a matte finish Mod Podge for the sealer. It worked just fine with the white paint, though I wasn’t sure how it would turn out.
Look how it turned out! Crisp lines, no glaze from a shiny sealer. Your sign will definitely be the envy of the neighborhood this summer!
While vinyl is usually very easy to apply on most surfaces, canvas can be a difficult one. Vinyl decals adhere better to smooth surfaces, and canvas is rough enough that it can create air pockets and overall be quite hard to get vinyl to stick to.
Vinyl can stick to canvas, as long as you take your time to prepare and apply it properly. Before we get started, make sure that you are using high quality, commercial grade vinyl. Using thick, sticky vinyl will not only make applying it easier, it will help your crafts and signs to last longer.
Our glossy vinyl or Oracal 651 are the best choices for crafts with canvas, as they have more adhesive than regular or matte vinyl types.
Prepping Your Canvas for Vinyl
Vinyl decals can adhere much better if you make the surface of the canvas smooth. One popular and easy way to prepare your canvas is by painting it. This fits right in with many crafts, and is inexpensive. If you’re not changing the background color at all, using a spray adhesive or mod podge is probably your best bet. When using a spray adhesive, make sure to let it dry before applying your vinyl.
Applying Vinyl to Canvas
Applying vinyl to canvas is similar to applying vinyl to a wall or other surface, but requires a few extra steps after you’ve prepared it as described above.
Set the canvas on a firm surface
Place the canvas on a hard, flat surface so that you can rub the vinyl on later. The best method for this is putting the canvas on top of a hardback book. Choose a book that will fit inside the frame around your canvas so that the canvas lies directly on top of it.
Place the vinyl on top of the canvas
Gently set the vinyl in its desired location on top of the prepared canvas. Make sure that it is in the final position that you want.
Rub on the vinyl
Starting in the middle, smooth the vinyl outward. Next, use a tennis ball or an old credit card to rub the back of the decal. The longer and more firmly you rub, the easier the vinyl will come off the transfer paper and stick to the canvas. Rubbing the decal helps the vinyl stick into any remaining crevices.
Peel back the transfer paper
Carefully peel back the transfer paper. If any sections of vinyl or letters stick to the paper or don’t stay on the canvas, place the transfer paper back on top of them and rub some more. You can also carefully heat the vinyl using a hair dryer on low power.
You do not need to seal vinyl on canvas. Actually, it can keep the vinyl from adhering properly to the canvas, so it is better not to seal it. Sealing vinyl on canvas can cause air bubbles or even cause the decal to deform.
In addition, the vinyl does not need a sealant to stay on the canvas. When properly applied, good vinyl will stick perfectly fine long term to canvas without a sealing agent.
How to remove vinyl from canvas
Removing vinyl from canvas is a delicate process. Depending on the craft that you are removing it from, some of the conventional tips may not work or be practical.
Unless your craft is heat sensitive or could dry out/crack if heated, use a hair dryer (on low power) to make the adhesive more pliable. Gently peel it up using tweezers or your fingernails. This shouldn’t be too difficult, especially with the difficulties of getting vinyl to stick to canvas in the first place.
If you need inspiration or have any further questions about getting your vinyl to stick to canvas, check out our FAQ or reach out on our Facebook page! We would love to help you with your projects. Feel free to also share your crafts on our Facebook page or tag us in your post. Happy crafting!
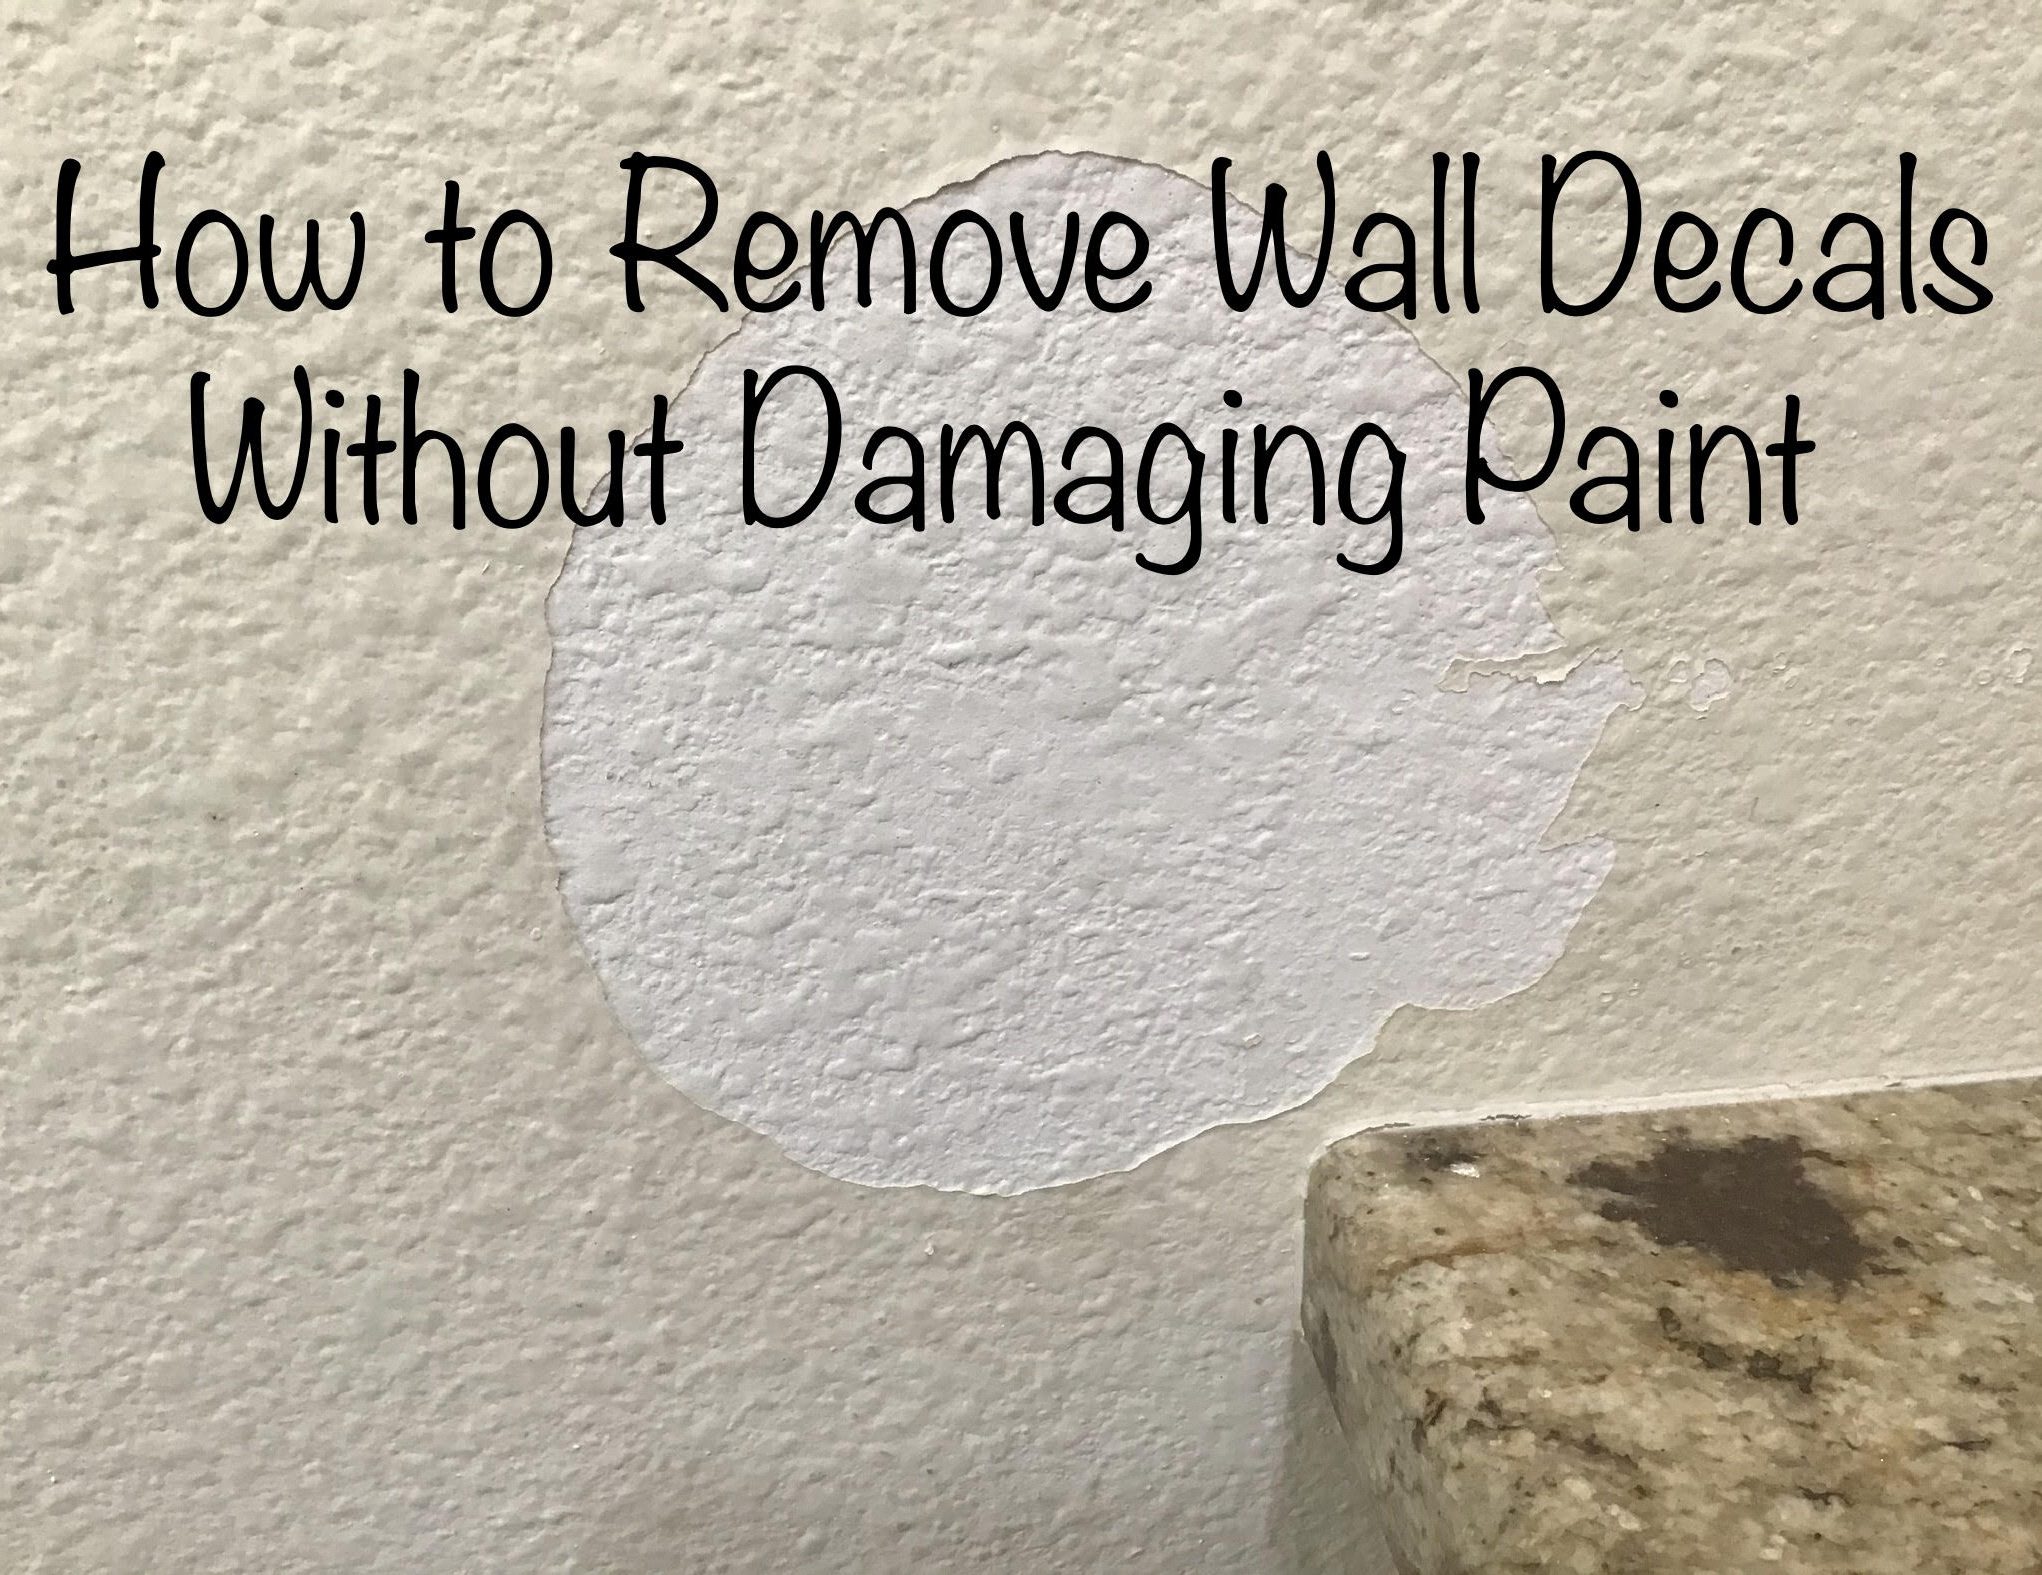
One of the most frustrating feelings is when your wall decal finally arrives or it’s been three weeks since you painted your wall and you try to apply your decal, but it falls off. You followed the instructions that came with your vinyl, used the backing paper, and after all that hassle, it won’t even stick to the wall!
Vinyl wall decals can be notoriously finicky. There are a variety of reasons why a decal might not stick- some having to do with the decal, some having to do with the wall. To figure out how to get your wall decal to stick, you first need to diagnose why it isn’t staying on the wall.
Why Wall Decals Sometimes Don’t Stick
A lot of different factors can impact how well a vinyl decal adheres to the wall. Some of the most common ones include:
Dirty Walls: If your walls aren’t totally clean, the wall decal will stick to the dirt and grime, not the wall.
New Paint: If you painted your wall recently, the paint emits gases up to 2 weeks after it dries. These gases can cause the adhesive to fail.
Cold Walls/Vinyl: When the walls or the decal are too cold, the vinyl won’t stick properly to the wall.
Unfinished Walls: Wall decals stick poorly to unfinished or unpainted walls (including brick walls). Old, peeling paint can also keep your decal from sticking. If your walls are unfinished or unpainted, take care of that before applying your decal.
Textured Walls: Some vinyl types don’t adhere to walls with any sort of texturing.
Too Dry: If you wait too long after receiving your wall decal before applying it, the adhesive will dry out, much like glue.
Sealants: Using sealants on your wall can actually prevent the decal from sticking. If a sealant gets under the vinyl wall decal, it can cause it to bubble and curl.
Cheap Vinyl: Lower quality vinyl often doesn’t have as much adhesive, which results in it falling off the wall or peeling.
How to Make Wall Decals Stick
Once you’ve figured out why your decal isn’t sticking right, you can find a solution by following the steps below:
Clean the Wall
Using some dish soap and water, gently scrub the wall. After you’ve removed all the built up dirt, completely dry the wall before moving on.
Warm the Decal
Carefully run a hair dryer on low power back and forth over both the wall and your decal. Continue heating specific sections of the as you apply it.
Rub the Decal
With a tennis ball or similar hard object, rub along the back on the decal on the wall. This presses the vinyl into the mountains and valleys on the wall (caused by texturing).
Sand the Wall
If your wall decal still has problems sticking to the wall texturing, you can use a paint scraper or sandpaper to smooth out the wall. This will flatten the surface and make it easier for vinyl to stick to.
Add Glue
Brush regular white glue onto the sticky side of your wall decal. This strengthens the adhesive and also helps reactivate it if it dried out.
Buy a New Decal
As a last resort, if nothing else works you can always purchase a replacement wall decal. If nothing else worked, your decal could be too poor quality or in some way defective.
Remember, it is normal for wall decals to lose some of their stickiness as they age or are moved. Under those circumstances, there may not be much you can do except ordering a new wall decal.
Generally, most issues with getting your vinyl wall decal to stick to the wall can be avoided through proper preparation and research. It is cheaper to buy high-quality, commercial grade vinyl in the first place than to spend hours trying to find a band-aid solution before ultimately replacing your wall decal. Make sure to follow the instructions that came with your vinyl exactly, and you shouldn’t have any problems applying your decal!
Perhaps you’re moving, and want to take your decor with you. Maybe you just think that a vinyl wall quote would look better somewhere else. Whatever the case may be, reusing wall decals may seem like a promising alternative to purchasing entirely new ones. However, it is easier said than done. In this article I’ll cover the two main obstacles to removing, saving, and reusing reusing vinyl wall decals, as well as how you can try to work around them.
Removing the Decal
While wall decals are easily removable, it can be difficult to get them off the wall in one piece, especially if it is a larger decal or one that was shipped in multiple pieces. Cheap vinyl will also often tear. Following best practices like heating the decal with a hairdryer can help, but successfully removing your decal in one piece is still a tall task.
Weakened Adhesive
In order to remove a wall decal, it is usually necessary to weaken the adhesive. The most common form of this is by heat. However, the adhesive on a wall decal naturally weakens when it is removed. Often some adhesive remains on the wall, or microscopic bits of paint or dirt stick to the decal, lessening its stickiness. This makes it hard to reuse- the vinyl just won’t stick to the wall again.
Important Disclaimer
While wall decals can sometimes be reused, we don’t recommend it. Attempting to reuse a vinyl decal can cause a mess, destroy your decal, and often doesn’t work. If your design breaks and you need to create a new one, visit our lettering designer or contact us. However, if you decide to try it, following the steps listed below will give you the best chance of successfully reapplying your wall decal.
How to Reuse Wall Decals
Despite the challenges of adhesive and removing the decal, under some circumstances wall decals can be reused. It takes patience and a steady hand, and requires the vinyl to be high quality. This works better with glossy vinyl, which has a stronger adhesive than matte vinyl.
Once you’ve started the process, try to finish within half an hour. The adhesive on the wall decal dries out when exposed, which weakens it further. If you’re planning to save your vinyl wall decal for a longer period of time, you will have to add extra glue.
1. Prepare the New Location
Before you remove the vinyl, it is important to prepare the decal’s new resting place. Wash off any dirt or accumulated grime that may have built up on the wall, then dry it off. This will help ensure the adhesive sticks.
2. Remove the Decal in One Piece
Next, carefully remove the wall decal in one piece. The best process involves using a hairdryer and tweezers, and is also less likely to damage the paint.
3. Strengthen the Adhesive
Place the decal sticky side up on a table or workbench. Brush or dab watered-down white glue (Elmer’s works just fine) onto the adhesive. This will supplement and strengthen the weakened adhesive.
4. Place the Wall Decal
Once you’ve prepared the decal to be reused, place it in the location that you cleaned earlier. Putting the decal on the wall is the same as when you first placed it. If the adhesive doesn’t stick, you can try rubbing the back of the decal with a tennis ball. If it still won’t stick, you can either add more glue and try again (cleaning the location in between) or order a new decal.
One of the biggest upsides to vinyl wall decals is that they are easily removable. However, sometimes the paint under the decal sticks to the vinyl when it is removed. This can ruin the wall by removing spots of paint and resulting in a patchy look.
To avoid this, there are a few important steps to take to ensure that your wall decal will remove easily and cleanly, without damaging your paint job.
1. Warm the vinyl with a hairdryer
Turn your hairdryer on low power and gently run it back and forth over the wall decal. The heat from the hairdryer weakens the adhesive on the vinyl. This makes it much less likely to remove any paint when you take your decal off. Focus on the corners, as that’s where it is easiest to begin removing the wall decal.
2. Peel the corner with tweezers
Using a pair of tweezers or your fingernails, gently peel back one corner of the wall decal. Once the corner is peeled back, check to see if there is any paint sticking to the vinyl. If there is, spend a few more minutes heating it with the hairdryer. If no paint is removed, peel back the rest of the decal. Work slowly and reheat sections with the hairdryer as needed.
3. Remove leftover adhesive
Scrub the wall gently with warm, soapy water to remove any adhesive residue from the wall decal. Be careful not to scrub too hard, which can damage the paint, especially if it was weakened by the vinyl removal. If the adhesive doesn’t come off, you may need to use a specialized adhesive remover (just make sure to test it first so it doesn’t harm the paint either). This step is especially important if you are removing a decal from a window or glass door, where traces of leftover adhesive are easy to see.
What to do if your decal damages the paint
If you used high-quality vinyl for your decal and removed it following the steps above, it is extremely unlikely that your paint will be damaged in any way. However, it does sometimes happen. If the wall decal ruins a section of paint on your wall, use a scraper to gently remove any flecks or curls of paint. If you don’t have a textured wall, you can also use sandpaper. Then, find a matching color of paint and repaint over the section. As a low-budget alternative, you can also cover up the damage by hanging a poster or moving furniture.
If you have any other questions about vinyl wall decals, please check out our FAQ page.
A dash of wit, a splash of vinyl, and now we’re cooking! Wall decals are a great way to personalize your kitchen and give it a little spice.
Many beautiful vinyl wall expressions customers have incorporated vinyl into the kitchen and it’s only heating up. Hop on the trend of custom wall quotes in the kitchen with these spicy, tasteful, and truly delectable custom vinyl expressions for the kitchen!
2 Cups of Names
Let people know it’s your food they’re about to enjoy! Vinyl is always a visual treat wherever it’s displayed, so use it to claim your kitchen! Here are a few brilliant ideas our customers have whipped up:
Use a shake of wit to spice up your kitchen! Here are a few samples:
1 Pinch of International Flavor
Food is an international language. We all know this. Regardless of who you are or where you live, you understand good food, right?! Well, then, get whisked away with this one:
(Italian)
3 Ounces of Faith
No matter what you believe about religion, I’m sure we can agree that food is something to be grateful for!
Here are more sizzling mealtime quotes to put a new spin on dinner:
All these cooking quotes are making my mouth water! Whether or not you spend a good chunk of your time in your kitchen, you can properly season the atmosphere with a custom vinyl decal.
The kitchen is the room from which good smells waft throughout the house, and family members are drawn. So, add a little flavor to your kitchen!
To all those scrum-diddly-umptious kitchen moments,
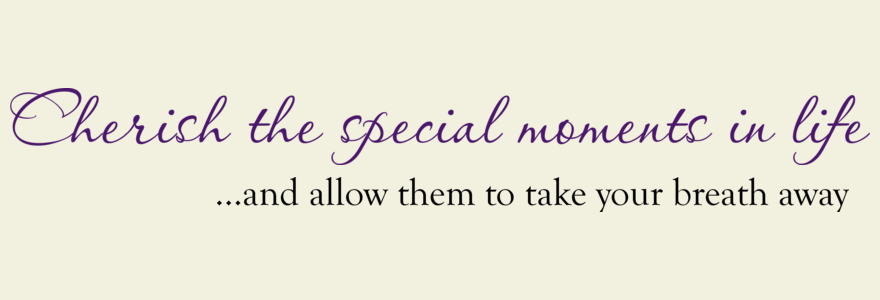
Custom vinyl wall decals are the perfect way to spruce up your living room! There are limitless possibilities, but these are the 19 wall quotes that took our breath away (and are sure to do the same for everyone who comes through your front door):
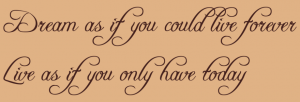
4 Inspirational Quotes
There are so many, and yet, I never get sick of searching for and reading them all! Check out these 4 uplifting ones:
Remember this every time you’re playing soccer with your kids and you take a shot to the stomach.
Just don’t spend too much time asleep.
Gandhi always said it best.
There’s no wrong place to put this in your house, but it certainly helps make the living room more peaceful.
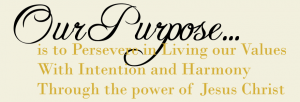
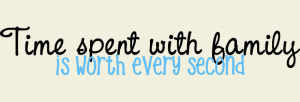
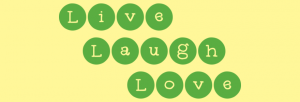
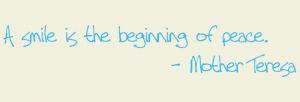
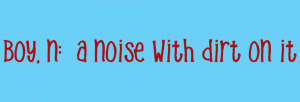
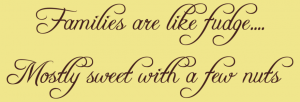
4 Family Mission Statements
Why not share your family’s hopes and dreams with those who come into your home? Why not display them for yourself and your family to see and remember every day? These 4 family purpose statements will inspire you to put up your own:
And for all you mathematicians who are challenged by limits, don’t forget L’Hospital’s Rule.
The perfect excuse to make your kids play Monopoly the right way.
Fill the heart of your home with what’s in your heart.
What better quote to take a quick cat nap under?
5 Family Maxims
Remember that thing Dad always said? What about Mom or Grandma? Here are 5 quotes to honor the guru in your family:
And probably Peter Pan.
We call it brownies.
Perfect for where your whole family gathers together!
True home medicine.
While you may read “get it”, your kid sees “yeet it”.
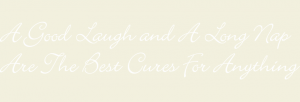
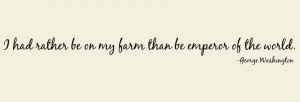
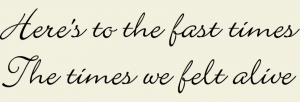
3 Relaxing Wall Quotes
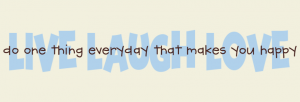
Add a little extra vacation to your home with some vinyl wall decals! Steal these 3 chillin’ quotes to compliment your living room (or design your own mental vacation response):
The perfect complement to beach decor!
Don’t worry, gardening’s not for everyone.
For some reason this always makes me think of E.T.
3 Wall Decorations
These custom letters make a perfect complement to your living room décor. A little design goes a long way! So, try these top 3 on for size:
If your not doing the second two, are you really doing the first?
Kites are always more fun with Mary Poppins.
Not every hobbit needs to leave their cozy hole to find adventure- it’s right there on the wall!
As a child my family moved every two years, but I can remember every living room we had. It was the place our family came together the most, to eat, to talk, to be couch potatoes, to read, to laugh, to yell, to rest.
The living room is a vital part of every home. So go on, and make your memories every day there! Give your living room the TLC it needs to keep everyone together, and all your memories in it will be just that much sweeter!
Somehow vinyl wall expressions users seem to get especially creative with vinyl in the bathroom, but I have to attribute this to the nature of a bathroom. Any vinyl user that puts vinyl in the bathroom has to take great care in addressing those subjects that aren’t well, let’s just say, exactly dinner-table appropriate. And the result is some of the cutest custom vinyl expressions I’ve ever seen!
You’ll want to comb these over and over!
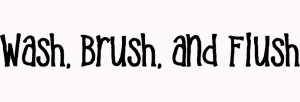
Top 3 Ways to Use Vinyl in your Bathroom:
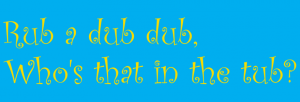
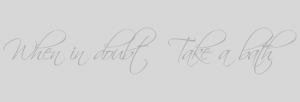
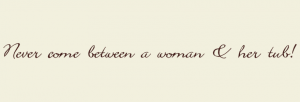
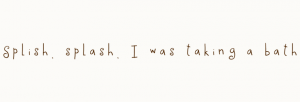
1) Over the Bathtub!
Oh, the bathtub’s one of the best places I know! It’s where some of the greatest inspirations and revelations come because I’m listening only to the sound of my own thoughts. So, put vinyl above this place of peace!
2) On the Mirror!
What a splendiferous idea to put vinyl on your bathroom mirror, somewhere you look every day! Let these custom vinyl quotes and humorous sayings wash over you:
3) Un-classifiable Vinyl Sayings for the Bathroom!
Put these on the walls, above the tub, above the toilet or on the mirror. Each one is a brilliantly creative bathroom vinyl lettering saying!
Wondering where this last one came from or what exactly a headcrab is?! Well, that makes two of us, but it made me laugh so I don’t feel the need to ask any more questions.
I thought vinyl wall expressions customers did an outstanding job of decorating the bathroom by keeping it real with just the right level of bathroom innuendos. They said what needs to be said about the bathroom, and they did it with proper poise!
So, rub-a-dub in your bathtub, and may the bubbles forever be in your bath,
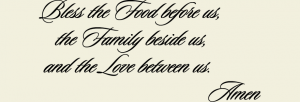
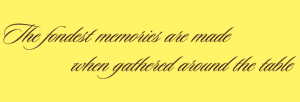
The dining room is where many families come together the most. It’s the setting for all those important dinner discussions, and of course where we love to chow down!
Maybe it’s just me, but when I eat I like to read; cereal boxes when I was just a youngin’, magazines in my teenage years, and the newspaper or journals now. It only makes sense I would put vinyl wall lettering in my dining room, right?
Top 5 Ways to Use Vinyl in your Dining Room:
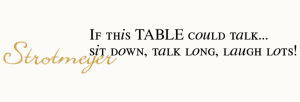
1) Food and Family Quotes
The two commonly go hand in hand. So, drink in these quotes highlighting food and family:
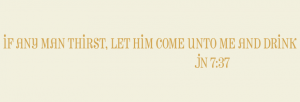
2) Religious Quotes
“Give us this day, our daily bread,” and others! Whatever your religious views, if they relate to food either metaphorically or literally, put them up in the dining room! Taste a few samples:
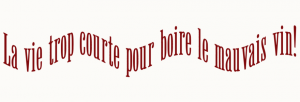
3) International Cuisines Please!
Tell everyone it’s time to eat and other meal time sayings in whatever language is yours or whatever language isn’t yours! Feast your eyes on these:
French for: Life is too short to drink bad wine!
(Fascinatingly, instead of “Live Well,” the French commonly say “Eat Well” or “Mangez Bien!” If you’ve ever eaten authentic French cuisine you can understand why! It’s delicious beyond belief!)
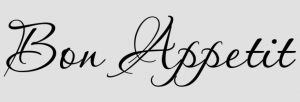
4) Dining Quotes
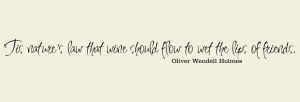
“There is no sincerer love than the love of food.” – George Bernard Shaw. “The belly rules the mind.” – Spanish Proverb. “Fish, to taste right, must swim three times – in water, in butter, and in wine.” – Polish Proverb. Here are more dining quotes you can eat up:
5) Say-it-Quick Dining Room Sayings
Say what you need to, then be quiet, and let’s eat! – I like this dining philosophy!
Space here is limited but there are more than a few ways to decorate your dining room with custom vinyl lettering. Feast in style, and love the experiences you make around the table because food brings families together! And friends!
So, finish complementing your home’s dining experience with food philosophies, quotes, and happy sayings. You’ll eat better, laugh harder, and live longer!